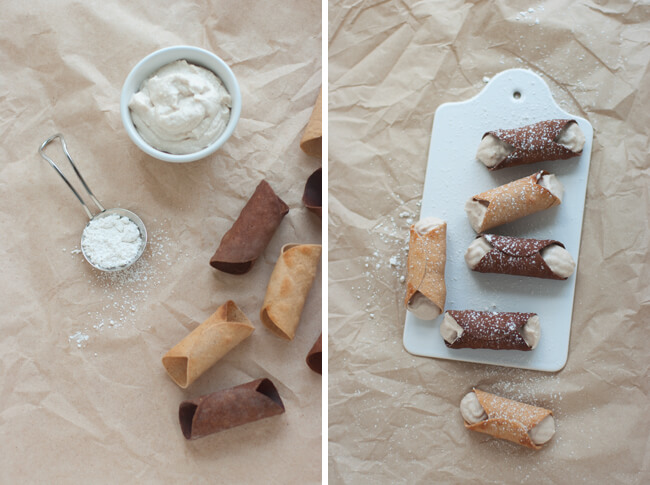
Daring Bakers' Banana-Mascarpone Cannoli, Site Update and Holiday Sale
It's that time of the month again ... Daring Bakers' time...
But before I tell you all about the deliciously crispy cannoli I wanted to mention that the website got a face lift. I would probably go as far as saying it got a new face all together. I was going for that bright and airy feel where imagery is all that matters so, if you are getting the updates through the RSS feed do drop by the site and let me know what you think.
And now that we have all the announcements out of the way we can get back to the story behind the crisp, banana-mascarpone filled cannoli...
I must admit that I, frustrated by the last DB challenge, felt a little relief when I opened the Daring Kitchen's forum and saw the following words: "Sorry all, we're not baking this month...". In my head I was already making plans for the free weekends I will have due to the absence of DB challenge this month.
"Yay!" I thought to myself and kept on reading, curious to find out why is it we're not baking this month. My initial "Yay!" pretty quickly turned into "Oh, no!" when I read that not only there will be a DB challenge this month, but we will be frying cannoli. What an unexpected turn of events!
The November 2009 Daring Bakers Challenge was chosen and hosted by Lisa Michele of Parsley, Sage, Desserts and Line Drives. She chose the Italian Pastry, Cannolo (Cannoli is plural), using the cookbooks Lidia's Italian-American Kitchen by Lidia Matticchio Bastianich and The Sopranos Family Cookbook by Allen Rucker; recipes by Michelle Scicolone, as ingredient/direction guides. She added her own modifications/changes, so the recipe is not 100% verbatim from either book.
Two potential obstacles to completing the challenge were the lack of cannoli forms, since I've never had the pleasure of making cannoli before, and the deep-frying of the shells.
The latter was resolved pretty quickly with the suggestion by our hostess to bake them rather than deep fry them, but what to do about the cannoli forms on such a short notice without spending a fortune?
Four cannoli forms at Sur la Table were going for $12 which is definitely the quickest way to get them, but if you're planning to bake more than 4 cannoli at a time it will cost you a pretty penny.
After a little research I found out that before the stainless steel forms came about wooden dowels were used to make the cannoli and that's what I decided to use as my cannoli forms.
A short trip to my local Home Depot and $13 later I was holding in my hands 18(!) 6-inch dowels which required a bit of sanding, cleaning, and seasoning. Seasoning was quite amusing; it's not often you get to deep-fry some wooden sticks.
Once the wooden dowels were well seasoned I was all set and ready to make some cannoli.
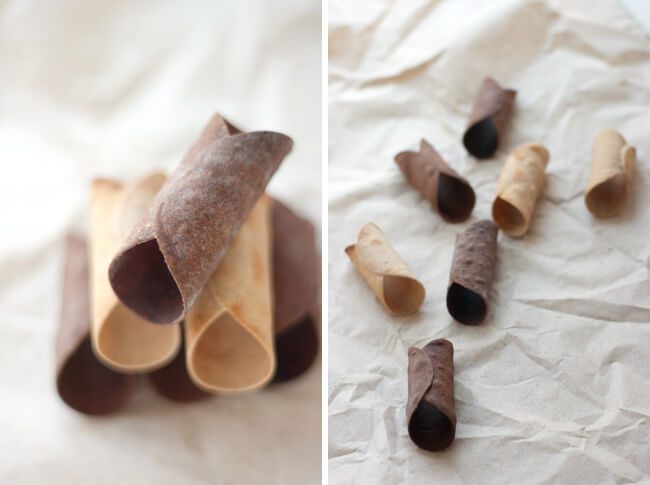
The recipe was simple enough to follow and I've actually used 1/4 of the amounts listed in the original recipe for each type of cannolo I've made. The hardest part was rolling that dough out. Apparently when you roll this dough out you get an unbelievable core workout that could not be even compared to the one you get from your regular visits to the gym. I had sore muscles for about 2 days after I've baked the cannoli and I only had 1/2 of the dough to roll out.
I made a few ingredients substitutions: regular sugar became vanilla sugar and white wine vinegar became red wine vinegar, just because I had those ingredients already in my pantry.
For the filling I've made my own mascarpone and ricotta cheese and instead of mixing in the traditional ingredients I decided to add a ripe banana, hence - banana-mascarpone filling.
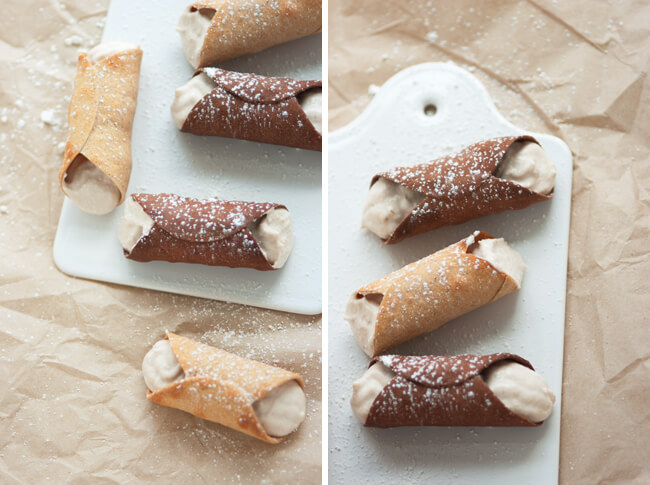
The chocolate cannoli were definitely my favorites. I loved how the kitchen smelled when I was making and rolling out the chocolate dough; just heavenly. I think the next time around I will be making only chocolate cannoli.
Lidisano's Cannoli
makes 22-24 4-inch cannoli
Prep Times:
- Dough - 2 hours and 10-20 minutes, including resting time, and depending on whether you do it by hand or machine.
- Filling - 5-10 minutes plus chilling time (about 2 hours or more)
- Frying - 1-2 minutes per cannoli
- Assemble - 20-30 minutes
Ingredients:
- Cannoli shells
- Cannoli filling
- 1/2 cup (approx. 62 grams/2 ounces) toasted, chopped pistachio nuts, mini chocolate chips/grated chocolate and/or candied or plain zests, fruits etc. for garnish
- Confectioners' sugar
Assemble the Cannoli:
- When ready to serve..fill a pastry bag fitted with a 1/2-inch plain or star tip, or a ziploc bag, with the ricotta cream. If using a ziploc bag, cut about 1/2 inch off one corner. Insert the tip in the cannoli shell and squeeze gently until the shell is half filled. Turn the shell and fill the other side. You can also use a teaspoon to do this, although it's messier and will take longer.
- Press or dip cannoli in chopped pistachios, grated chocolate/mini chocolate chips, candied fruit or zest into the cream at each end. Dust with confectioner's sugar and/or drizzles of melted chocolate if desired.
Note: The equivalents from this recipe were prepared using this conversion site
Cannoli Shells
Ingredients:
- 2 cups (250 grams/16 ounces) all-purpose flour
- 2 tablespoons(28 grams/1 ounce) sugar
- 1 teaspoon (5 grams/0.06 ounces) unsweetened baking cocoa powder
- 1/2 teaspoon (1.15 grams/0.04 ounces) ground cinnamon
- 1/2 teaspoon (approx. 3 grams/0.11 ounces) salt
- 3 tablespoons (42 grams/1.5 ounces) vegetable or olive oil
- 1 teaspoon (5 grams/0.18 ounces) white wine vinegar
- Approximately 1/2 cup (approx. 59 grams/approx. 4 fluid ounces/approx. 125 ml) sweet Marsala or any white or red wine you have on hand
- 1 large egg, separated (you will need the egg white but not the yolk)
- 2 quarts (8 cups/approx. 2 liters) vegetable oil for frying
Directions:
- In the bowl of an electric stand mixer or food processor, combine the flour, sugar, cocoa, cinnamon, and salt. Stir in the oil, vinegar, and enough of the wine to make a soft dough. Turn the dough out onto a lightly floured surface and knead until smooth and well blended, about 2 minutes. Shape the dough into a ball. Cover with plastic wrap and let rest in the fridge from 2 hours to overnight.
- Cut the dough into two pieces. Keep the remaining dough covered while you work. Lightly flour a large cutting or pastry board and roll the dough until super thin, about 1/16 to 1/8" thick (An area of about 13 inches by 18 inches should give you that). Cut out 3 to 5-inch circles (3-inch - small/medium; 4-inch - medium/large; 5-inch;- large. Your choice). Roll the cut out circle into an oval, rolling it larger and thinner if it's shrunk a little.
- Oil the outside of the cannoli tubes (You only have to do this once, as the oil from the deep fry will keep them oiled). Roll a dough oval from the long side (If square, position like a diamond, and place tube/form on the corner closest to you, then roll) around each tube/form and dab a little egg white on the dough where the edges overlap. (Avoid getting egg white on the tube, or the pastry will stick to it.) Press well to seal. Set aside to let the egg white seal dry a little.
- In a deep heavy saucepan, pour enough oil to reach a depth of 3 inches, or if using an electric deep-fryer, follow the manufacturer's directions. Heat the oil to 375F (190C) on a deep fry thermometer, or until a small piece of the dough or bread cube placed in the oil sizzles and browns in 1 minute. Have ready a tray or sheet pan lined with paper towels or paper bags.
- Carefully lower a few of the cannoli tubes into the hot oil. Do not crowd the pan. Fry the shells until golden, about 2 minutes, turning them so that they brown evenly.
- Lift a cannoli tube with a wire skimmer or large slotted spoon, out of the oil. Using tongs, grasp the cannoli tube at one end. Very carefully remove the cannoli tube with the open sides straight up and down so that the oil flows back into the pan. Place the tube on paper towels or bags to drain. Repeat with the remaining tubes. While they are still hot, grasp the tubes with a potholder and pull the cannoli shells off the tubes with a pair of tongs, or with your hand protected by an oven mitt or towel. Let the shells cool completely on the paper towels. Place shells on cooling rack until ready to fill.
- Repeat making and frying the shells with the remaining dough. If you are reusing the cannoli tubes, let them cool before wrapping them in the dough.
Note: If you want a chocolate dough, substitute a few tablespoons of the flour (about 25%) with a few tablespoons of dark, unsweetened cocoa powder (Dutch process) and a little more wine until you have a workable dough.
Cannoli Filling
Ingredients:
- 2 lbs (approx. 3.5 cups/approx. 1 kg/32 ounces) ricotta cheese, drained
- 1 2/3 cups cup (160 grams/6 ounces) confectioner's sugar, (more or less, depending on how sweet you want it), sifted
- 1/2 teaspoon (1.15 grams/0.04 ounces) ground cinnamon
- 1 teaspoon (4 grams/0.15 ounces) pure vanilla extract or the beans from one vanilla bean
- 3 tablespoons (approx. 28 grams/approx. 1 ounce) finely chopped good quality chocolate of your choice
- 2 tablespoons (12 grams/0.42 ounces) of finely chopped, candied orange peel, or the grated zest of one small to medium orange
- 3 tablespoons (23 grams/0.81 ounce) toasted, finely chopped pistachios
Directions:
- Line a strainer with cheesecloth. Place the ricotta in the strainer over a bowl, and cover with plastic wrap and a towel. Weight it down with a heavy can, and let the ricotta drain in the refrigerator for several hours to overnight.
- In a bowl with electric mixer, beat ricotta until smooth and creamy. Beat in confectioner's sugar, cinnamon, vanilla and blend until smooth. Transfer to another bowl and stir in chocolate, zest and nuts. Chill until firm.(The filling can be made up to 24 hours prior to filling the shells. Just cover and keep refrigerated).
Note: If you want chocolate ricotta filling, add a few tablespoons of dark, unsweetened cocoa powder to the above recipe, and thin it out with a few drops of warm water if too thick to pipe.
- Esculent, Recipes, Portrait, USA, Daring Bakers
November 27, 2009
what's new
✚ Observer project is currently ongoing.
Revealing one image a week.
✚ Eremic Exuberance project is up as part of the Projects page and is currently ongoing.
✚ Brewed Awakenings exhibition is up in the Lightful Imagery Gallery till June 23rd, 2025.
✚ On the go II exhibition preview is currently ongoing.
New images are revealed in the monthly newsletter.
Sign up for the newsletter to follow along.
recent
you might also like...
selected prints
STAY IN TOUCH
Sign up to receive monthly updates on new images, new art prints, new exhibitions, new projects, exhibition previews and art print sales right in your Inbox to be enjoyed at your leisure.
SUPPORT
ARCHIVE
- All (575)
Categories:- Abstract (161)
- Black & White (52)
- City (123)
- Details (45)
- Esculent (43)
- Exhibitions (12)
- Fauna (5)
- Flora (326)
- Interior (7)
- Landscapes (11)
- Macro (233)
- Recipes (9)
- Reflections (46)
- Sky (3)
- Still (31)
- Waterscapes (24)
Format:- Landscape (192)
- Portrait (221)
- Square (150)
Places:- Canada (8)
- Czech Republic (2)
- Denmark (6)
- England (2)
- France (4)
- Israel (5)
- Italy (1)
- Norway (7)
- South Africa (1)
- Spain (13)
- Sweden (21)
- USA (484)
Series:- Colors of the Desert (14)
- Cutlery Improvisations (10)
- Daring Bakers (13)
- New Mexico: Arts & Crafts (9)
- Tulip Abstractions (8)

